In this article, we’re going to learn how to install acoustic foam without damaging the wall. We are going to be using command strips to prevent the wall from suffering any damage. Leaving no damage to the wall is especially important if you live in an apartment. The apartment has to be in the same condition when you move out as when you moved in.
I learned how to install acoustic foam while in school where I was in charge of sound management for a small radio show. They still have the same acoustic foam soundproofing that I installed years ago.
Why You Should Use Acoustic Foam
That are several reasons why you should use acoustic foam. There are multiple ways to control the sound of a room, and one of the most common ways is with acoustic foam. Acoustic foam is affordable and readily available on Amazon. You can purchase them in different colors and amounts.
My personal preference for home and for the project I did in school years ago is using grey acoustic foam. I chose grey because I find they look way more professional. No matter what color you want, they all primarily work the same. Acoustic foam is used to absorb sounds before they can bounce off your floor, wall, ceiling, etc.
Why You Should Not Use Acoustic Foam
Without a suitable thickness of acoustic foam, the sounds bouncing off the walls can get recorded, and that is the last thing you want if you work in sound management. If using the foam correctly are the voices or the direct sound to the microphone.
There are some things to think about when using acoustic foam on your walls or ceiling.
Fire Hazard; If there happens to be a fire breaking out near acoustic foam, the foam will cause a lot of smoke when it is burning.
Bouncing Sounds; If you do not install acoustic foam correctly, it will not absorb the sound and will make it bounce back and can ruin recordings. If you follow the steps here and take your time to install correctly, It will work as intended and deaden the sound in the room. You can always hire a professional to install it if you’re worried. However, there’s a difference between soundproofing and acoustic treatment.
Difference Between Sound Proofing and Acoustic Treatment?
To simplify the difference between soundproofing and acoustic treatment is that soundproofing is for lowering the sounds that go in and out of your room. You might want to soundproof if you don’t want to worry about disturbing others around you; or if you are near a noisy highway and don’t want to let that sound come in.
Acoustic Treatment is used to limit sound reflections within an area or room. This help makes the sound recorded in that room sound better. Both soundproofing and acoustic treatment are essential, but they are not the same thing. They can’t do the job of the other, but they can be incorporated together. If you are getting these acoustic foam pieces to help quiet noise, it really won’t help you achieve that. However, it will help you shape the sound of the room you are recording in.
Different Ways to Instal Acoustic Foam
There are many different ways to install acoustic foam.
You can use a hammer and nails.
Foam Tacks.
Adhesive spray
One thing these three examples above are that they will all cause damage and if you’re living in an apartment, then that’s off the table.
Command Strips are a great affordable solution. You can get a pack of 48 command strips for under ten dollars from Amazon. (Link to Amazon for current price.)
48 command strips should be more than enough to accomplish what you need regarding the installation of acoustic foam. You can also remove the command strips without damaging the wall.
Installing Acoustic Foam Using Command Strips
Installing Acoustic Foam Using Command Strips.
Now we will be installing acoustic foam using command stips.
The first step is to measure the area you wish to install the acoustic foam. That way you know if you have enough space for the amount of product you have.
The second step is cleaning the command strips. No matter what brand of command strips you purchase, rub the surface of the command strip with rubbing alcohol. Do not use household cleaners. I’ve made that mistake in the past, and it did not work well for me.
On the third step, separate the strips and apply them to each corner of the acoustic foam. If you have 48 strips, then each foam tiles should have four strips attached to them and is also the recommended amount for the type of strips I am using.
Once you have decided how you want the acoustic foam to go on the wall; go ahead and place the foam pieces on the wall. Press each strip firmly to the wall for thirty seconds. Failure to do so can result in the pieces falling once you complete the job.
Once you are done with these four steps, you are done with installing acoustic foam without damaging the wall.
The Acoustic Foam I recommend
The acoustic foam I always buy if I need to stop the noise from bouncing around is the Mybecca 2″ X 12″ X 12″ Acoustic Panels Studio Foam Wedges, 48 Pack.
Other Ways to Soundproof (Rugs, Corner Pieces, etc.)
There are different ways to treat and soundproof a room. One way is by adding a rug or installing carpet to absorb some of the sounds.
Another way to soundproof a room is by utilizing corner pieces of acoustic foam to help with sound reflections.
Other ways are by blocking walls with heavy materials. If you are going to soundproof, make sure to check for STC (Sound Transmission Class Rating). Generally speaking, the higher the rating on the foam, the better it will perform.
Please let us know if you found this article helpful. Please share with anyone you know that might want to soundproof using acoustic foam without damaging the wall. Let us know if you followed the installation steps laid out and if you are satisfied with the results.
Have you ever wondered while sitting in your ca or slamming the car door, about how to soundproof car doors? We will talk about how to make your car door sound better and heavier by way of soundproofing car doors. The first thing to understand when we talk about soundproofing is that it can never be fully accomplished in any vehicle. What we want to do is reduce the amount of external noise, internal noise, and vibrations. Soundproofing your car doors will make your car sound much more robusk when you shut the doors. Some cars interior doors do not have any sound deadening material. When you shut the door of a car that lacks the necessary sound deadening material, it makes it sound like a tin can
A quieter ride, fewer distractions, and an overall more comfortable environment are what you can expect when you start soundproofing your car. The methode of soundproofing we will be talking about is not only to make your door feel less hollow but it will also stop the vibrations if you turn on some heavy base.
Some people also call it by what it really is which is sound deadening your car door. After you’ve completed the process you will notice the car doors sound a lot better when opening, closing the doors and especially while driving. If your car doors do not have any sound deadening applications the door will sound hollow and thin, essentially making the car sound cheap.
You can achieve better sound deadening for your car door for approximately $20!
Backstory About Sound Deadning a Car Door
I will give you a bit of a backstory on the car that I own. And good reasons for sound deadening a car door. This story can apply to many cars on the road today.
I own a small BMW sports car that sounds cheap when opening and closing the car doors. I didn’t really notice that much when I fell in love with it in the used car lot, or maybe I just chose to overlook that small aspect of the vehicle.
BMW wanted to build a sports car that was lighter than the previous generations and also its competitors. In order to make the car lighter, they decided that sound deadening the car doors was not worth doing. Because of the lack of soundproofing in the car doors, they sound like they are going to fall off every time you open or close them.
You can easily check if there is soundproofing in your car doors by knocking on them. If they sound hollow they probably lack the proper sound deadening elements. If they sound heavy and thick, they most likely have something in there that is helping with the sound deadening.
BMW Corp. also decided that it was a bad idea not to have sound deadening in their car doors. In later years, they added the proper material inside the doors to make them sound much better. The sound deadening material inside the car doors also makes the vehicle feel more upscale.
What You Need To Sound Proof a Car Door
Noico 80 mil Sound deadening mat is what I used to sound deaden my car doors. At the time of purchase, it was the best price for 80 mils automotive butyl and foil sound deadening on Amazon. It was also around 20% less expensive than Gtmat, Boom Mat, and Extreme. It turns out to be a more cost-effective solution than such brands as Dynamat Xtreme, Hushmat, and Stinger RoadKill as well!
Noico 80 mil Sound deadening mat.
I see some people using the same adhesive tape that is being used to repair the roof of their house. It is less expensive than this product that is made specifically for sound car doors sound deadening. The problem with some of the roofing adhesive tape is if you live in a warm climate the tape will begin to smell like asphalt. Buy the right product so you don’t regret it months down the road.
This particular automotive self-adhesive insulation consists of butyl. Noico sound deadening has a total weight of 0.7 lbs/1sqft. This weight ensures maximum efficiency and sound insulation; Knowing how heavy it is, you won’t be sacrificing any horsepower like some automaker seems to think by not sound deadening car doors, I think it is just a cost-cutting initiative on the part of the car companies.
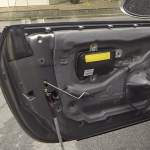
Depending on what car you have, you will have to find the necessary screws to take out so you can remove your inner panel. You can find that information in your vehicles owners manual. If the information you’re looking for is missing from the car’s owners manual you can easily find what you are looking for on Google.
After you’ve successfully removed the inner door panel you should see a seal that you need to remove. You might need a razor blade to be able to take the seal off the door panel. The seal should be fine If you’re careful and you take your time removing it with the razor blade. Keep removing the seal until you see a hole and have sufficient access to your inner door panel to place the sound deadening tape in your car door.
Carefully place the sound deadening tape into your car door through the exposing holes. Make sure to cover the entire surface as best you can. After you’re done, knock on the exterior of the door to see if there are some hollow sounding spots left and cover those surfaces.
Since you have the inner door panel plastic part removed, tap on the plastic and cover the hollow sounding spots with the car door sound deadening tape. You will see in the before and after pictures if you’re unsure as to what I mean.
Behind the plastic panel taken off.
Note: Do not unplug the doors airbag because you probably will have an airbag light come on.
You’re Done!
Now that you’ve finished taping the interior of your car door with sound deadening tape you can now put your door back together.
Alternative Spray-On Car Sound Deadening Material
An alternative car sound deadening material you can apply to the interior of your inner door panels comes in the form of a spray. In the past, it used to be that spray-on sound deadener in-car applications were only done in professional shops. Now anyone can purchase this product in an arosol can and do it the DIY way and save tons of money.
Here is the full product description. “Boom Mat Spray-On sound deadening is perfect for reducing unwanted road noise; deadening vibrations in those hard to reach places. Places such as trunk interiors, fender wells, undercarriage, body panels, rear quarters, and inside door panels to name a few. Boom Mat Spray-On also serves as a thermal barrier insulating against unwanted heat. Whether you are looking for a quiet ride by eliminating squeaks, rattles, vibrations or unwanted engine and road noise, the benefits of Boom Mat Spray-On sound deadening can be used on any vehicle. Boom Mat Spray-On can be applied in multiple layers for even more sound deadening while handling temperatures up to 300 degrees Fahrenheit. It can be applied to non-coated surfaces and can be top coated with paint after only 6 hours of dry time. Boom Mat Spray-On is VOC (Volatile Organic Compounds) compliant in all 50 states.” Description from Amazon.com.
The application of a spraying sound deadening product would be substantially the same as the above application method.
More Information on Noico 80 mil Sound deadening mat
Here is more information and questions you might have that we are able to answer about the Noico 80 mil Sound deadening mat we used to soundproof a car door.
Noico 80 mil Sound deadening mat.
Is this good for high heat applications such as the headliner?
The answer to this question comes straight from the seller of this product. Note that you can use this to sound deadening under the hood of your car as well.
“Noico 80 mil works well for high heat applications such as headliner. It does, however, have certain temperature limits that should be observed. Its temperature limits are from -49 degrees F to 400 degrees F where 400 degrees F is only OK for short-term heating. Noico 80 mil is primarily a sound deadening material that eliminates noise and rattles. If you are after heat & cool insulation then you might want to look for closed cell foam liner material that is designed specifically for thermal insulation of the vehicle.”
Will putting a double layer of this help make your interior silent?
I was wondering this while I was applying this to my car doors. I searched for a Reddit message board and indeed someone did use two layers and works wonderfully. It won’t cut the sound by half from having one layer; But the thicker you make it, the more noise it is able to absorb.
Examples of Sound Deadening Car
Examples of Sound Deadening Car Doors
here’s examples of how much you would have to buy if you want to do the inside of your doors. It will give you an idea of how much you will need for your own vehicle.
How many square ft would be required for a Toyota Prius C?
For a subcompact vehicle, the size of a Toyota Prius C is going to require 18 sqft for two doors. To cover all four doors will require 36 sqft. (They come in packs of 36 sqft.)
Chevrolet Tahoe / Full Size SUV
Here is a calculation for the doors only of a Chevrolet Tahoe. Please bear in mind that the below calculation might have a minor deviation in sqft. The two front door will require 26 sqft and the two rear doors will require 24 sqft total. For a full-size SUV, you would only need to purchase to packs of 36 seats.
Conclusion
I hope that you found this article and tutorial helpful. Please leave a comment below if you’ve completed this process and let us know how it went.
Have you been thinking of soundproofing a room in your new construction but don’t have the financial means to spend hundreds of extra dollars to do so?
Why would you not give it a try because most of us when building a new house goes over budget by thousands, so every dollar counts in these final phases of construction? I have great tips on how to soundproof a room for under 50 dollars that actually work! And the best thing about this soundproofing tip is you don’t need a contractor to make it happen you can easily go the DIY route.
So, of course, this method that im going to talk about will not do as good a job as what you would get if you spent a thousand dollars to soundproof a room in your house but it will certainly help. This phase is pre-drywall so if you already have. The drywall installed then this is not the article for you. BUT you can indeed click on our home button and check out our many other soundproofing articles to find exactly what you’re looking for.
Lets now focus on when to spend your fifty dollars because with this little amount of money you want to go straight to the spots that will make the most significant difference. What I want you to do now is think about the room you want to soundproof or better yet, stand inside the room. The first wall you want to cancel from this soundproofing project is an exterior wall. The second wall you should forget about is the partition that contains the closet. Closets do a great job at sound deadening because of the air gap and also the clothing inside the closet absorbs a good amount of noise.
Now you should have two walls left if the room you want to soundproof is similar to the type of room im referring to. The walls you want to focus on is the one that adjoins to a hallway and to another room like a washroom. Hallways are notoriously loud; And you can also imagine how loud and annoying a toilet flushing in the middle of the night can become.
All you will need for this little project is one tool and two items that will cost you around 50 dollars!
Hex Rod Cradle CaulkingGun; Caulking guns, also called caulk or cartridge guns, dispense a controlled flow of products such as caulk, sealants, and adhesives from a tube or cartridge. A manual caulking gun consists of a frame which holds the tube, a trigger, and a rod which moves forward when the trigger is depressed, dispensing the product. Manual caulking guns have a thrust ratio; the higher the thrust ratio, the easier it is to dispense the caulk, sealant, or adhesive. Click here for current Amazon price/Usually under ten bucks!
SpecSeal Putty Pads; These pads feel double the thickness and weight of “Flame Tech pads.” The only downside is the texture is more like playdough, and when you open them by pulling off the plastic wrap, the putty pad tends to curl inward and stick to itself. All you need to do here is hang on to the corner when you open it, and you should be fine. I found it easier to work with than other pads of the same type; I found the SpecSeal putty pad more pliable than the cheaper competitor. Wear gloves while applying these pads, they are very sticky. They will hold long term, but I would still apply some acoustical caulking around this product just to be sure. Click here for more information on Amazon.
Green Glue NoiseproofingSealant; Like cracks in the armor, the best soundproofing strategy will fail if there are cracks and other gaps in a wall, floor, or ceiling that left uncovered. Green Glue Noiseproofing Sealant seals the cracks and gaps to prevent unwanted noise from escaping a room. It is non-hazardous, has practically no odor, and it resists drying out or cracking with age. Click here for more information on Amazon
Let’s Begin Soundproofing a Room for Under 50 Dollars
Now that we have our products we can begin the process of soundproofing a room for under 50 dollars. So before you put the sheetrock up, you will want to focus on all the holes that will remain after the sheetrock is installed.
Sheetrock itself does a great job at soundproofing, it is very dense and heavy and will do an adequate job at stopping some of the noise coming from the adjoining rooms. But remember all the holes that are left in the drywall. Anywhere there’s a hole in that drywall there will be a lot of noise travel through there because there’s air that can travel through there. All the electrical outlets are big holes in your drywall, so that’s where we are going to focus first.
Sound Traveling Through Holes and Cracks
Before I continue, I wanted to address a concern I’ve heard previously from some people online. I’ve mentioned in my excellent article “How to soundproof a Basement Ceiling” about air being a perfect insulator. That is true, but we are talking about two different concepts when talking about noise reduction. The sound generated by striking a wall or floor is different then sound traveling first through the air and then hitting that same wall.
Like I’ve previously mentioned, sound travels faster through solid objects, but the mass of an object is what dampens it when moving through the air. A tiny hole is essentially having zero mass between the noise and the person in the other room. Making something airtight then adding mass will soundproof.
Step 1 – Ceiling Holes and Cracks With SpecSeal Acoustical Putty Pads
Our first step is to seal the holes and cracks that will be left after the drywall is installed. So before installing your drywall, get your SpecSeal acoustical putty pads because we are going to wrap them around your electrical outlets.
Air gaps in electrical outlets.
If you take a closer look at the electrical outlets, you will notice that there’s air that can travel through the holes where the electrical wires are going through. That’s where you will want to spend some time and energy by detailing those holes. The putty pads are like play dough, they are very formable and moldable but take your time installing a pad on every outlet.
SpecSeal acoustical putty pads.
First, focus on the knockouts where the electrical wires are going through by sealing those holes and adhering the putty with the wires onto the plastic box. You also need to seal any knockouts that are not in use. There are typically two on the bottom and two on the top. There might even be four on each end If you have a double outlet. Make sure they are entirely air sealed by using the acoustical putty pads.
Step 2 – Sealing The Drywall With Green Glue NoiseproofingSealant
Sealing with Green Glue soundproofing sealant.
Step two will be during the drywall installation phase. If you’re hanging the drywall yourself, here’s a small tip for you. By using the green glue noise-proofing sealant, position the sealant in between the sheets of drywall. When the two layers of drywall meet, they will automatically seal on each other.
If You’re Not the Drywall Contractor
Air seal electrical outlets where the sheetrock meets the outlets.
If you’re not the drywall contractor and you’re doing this process after the drywall is in place, you will not be able to seal in between the sheets. That’s not quite as important; the most important is to air seal the electrical outlets where the sheetrock meets the outlets. Lay the sealant on all four sides where the sheetrock meets the outlet.
The acoustical sealant your using will probably be enough to do an entire room if you have around five or six outlets. One tube will cost approximately twenty-five dollars. Don’t skimp out on the right sealant and use regular painters caulking. Regular painters caulking will not work well in the long term because it will harden and crack over time while a soundproofing sealant is going to remain flexible for the lifetime of the product.
Another tip for you if the drywall is already in place, apply sealant between the drywall and the floor. Lay the green glue sealant right at the joint where the drywall meets the wooden subfloor. That will help soundproof that bottom plate area.
Conclusion on How to Soundproof a Room For Under 50 Dollars
I know what you’re thinking, this will probably not soundproof a room well. All I can say is that if you only have around fifty dollars to spend soundproofing a room, these are the most important things to do to have the best results possible. You would be surprised as to how much noise reduction there will be by simply sealing cracks and filling holes.
I hope you learned something today and please leave a comment in the comment section below if you know how to soundproof a room for under 50 dollars and what are the results of your soundproofing project. If you have more money to spend on soundproofing, check out my other articles on how to soundproof withing your budget.
When my wife was pregnant with our identical twin boys, we knew we had to learn how to soundproof a nursery! Our toddler moved into the smaller bedroom so the twins could be together in separate cribs but the same bedroom.
Let’s say, now that the twins are four years old, we are pleased that we chose to soundproof the nursery! Two crying babies can be quite noisy at times, and by soundproofing the baby’s room, it keeps baby’s cries from echoing through the entire house.
How important is it to have peace and quiet in the nursery while the baby is sleeping?
Infants find it much easier to fall asleep in a quiet room. You might think the baby is going to make some sounds, but those are to alert the parents. When babies make noises, particularly an infant, it is usually a cry because they are wet, hungry, or even uncomfortable.
Those cries are cues that parents have to listen for and attend to and quiet the child. It is essential for the babies’ development that they have a good night’s sleep; Even when it is broken up by feeding period. Babies need a certain amount of sleep because most of the child’s development accrue when they sleep.
1. Instal a Solid Core Door
One of the easiest things you can do to soundproof a baby’s nursery is to install a solid core door! If you’re unsure if you have that type of door or not;
Go up to the baby’s room door and knock on it. If it sounds heavy and thick like a chunk of wood, then you have a solid-core door. All exterior doors will be solid core. Doors that lead to another interior room of a house are almost always hollow-core doors, which do very little regarding soundproofing.
If you have a hollow-core interior door leading to the nursery, then consider heading to Lowe’s or Home Depot and buying a solid core door for $99. You can either hire someone or make it an afternoon DIY project.
2. Instal carpeting or place a rug in the nursery For Sound Deadening
Carpet or an area rug can go a long way toward good sound deadening for a nursery. Hardwood flooring will project sound from one end of the room to the other and leave an echo. You can even buy some Multi-color exercise tile mats. They are made of solid foam and are also great for infants to safely play on the floor.
I see people sometimes pay a fortune for these types of tile mats, but you can also buy some inexpensive, high-quality mats online. Here is an Amazon link for the tile mat we purchased. They should even have these at your local Wal-Mart.
3. Ever Heard of a Sound Dohm? Get One!
Marpac Dohm white noise machine
One of our best investment was purchasing a Sound Dohm. It’s basically a white noise machine that lightly drowns the noises from the other rooms. The sound Dohm projects a soothing sound for the baby and helps avoid being prematurely woken up due to exterior noise.
Studies from the national sleep foundation (Click here to view the study) have shown that white noise machines can have astonishing effects on babies, just like on adults. White noise machines can mimic sounds babies heard while in the womb and masked other sounds that may disturb their sleep cycle.
The one we purchased was the Marpac Sound Dohm (Amazon Link). The reason why we chose the Marpac sound Dohm is because the national sleep foundation “officially” trusts it and the majority of the reviews were positive.
4. Install Sound Proof Curtains and Windows in the Nursery
Soundproof curtains in a babies room is another one of those easy DIY projects. Soundproofing Curtains are thicker and help in sound deadening some of the outside noise from coming in the room.
Where you really see the benefits of these types of thick curtains is its ability to absorb some of the sounds from inside the baby’s room. It does do a reasonably good job at reducing some of the echoes from inside.
A siliconized acrylic sealant caulking is designed to be flexible over time so that it doesn’t harden. You should use this to seal the gaps and cracks in the wall. These cracks can appear where the base plate meets the floor. They can also appear around the outlets after the drywall went up while in the construction stages. You can easily find this at your nearest hardware store.
6. Double Wall
You could double-layer the drywall on whatever wall with the most significant issue. If the room on the other side of a particular wall in the living room, it wouldn’t be a bad idea to add a second layer of drywall. The second layer of drywall will help reduce the noise from people talking and the TV.
It’s also nice for anyone in the living room because they won’t have to be so careful at being quiet. If the other side of another wall is the washroom, adding a double layer would also help in case the toilet flushing wakes the baby. This is something that you could quickly do yourself, and you wouldn’t even notice the difference after its installed correctly. Meaning the room won’t shrink that much!
One thing I notice people forgetting to mention on other websites is to apply “green glue noise proofing compound” (Click Here for Amazon Link). Apply this compound to the back of your second layer of drywall in any random pattern. You will need two tubes for every 4 X 8 sheets.
7. Some Wallpapers Work For Sound Deadning
It seems the wallpaper trend is coming back. Perhaps not the 1975 pattern wallpaper but a new and improved style. We didn’t install any wallpaper ourselves, but we have friends that have some lovely and also spongy wallpaper. It would seem that the sponginess can somewhat be useful for noise deadening. It looks nice after they painted it light green. Here is an Amazon link for the wallpaper they purchased.
You can even place some wallpaper on the ceiling, I’ve seen that before as well.
8. Sound attenuation in the nursery
If the nursery has angular walls and hardwood floors you’ll want something to absorb the echoes of a baby crying in particular. As many of the new homes have granite surfaces, marble floors, wood floors, plastered ceilings. All those hard surfaces create a lot of echoes.
There is a product that you can easily install on the ceiling called the Quiet Zone Solserene Fabric System, and it sells for around six dollars a square foot. This fabric mounts directly over the existing ceiling.
The Solserene fabric system is made up of three main components; A track that goes around the edges of the ceiling; But the main sound absorber is the high-density fiberglass board with a fiberglass mesh that goes on the bottom. The bottom section absorbs sound; it does not block sound as the hard surfaces would, it absorbs the noise that’s in the nursery and softens the space so a baby can sleep better.
This system is covered up with acoustically transparent fabric, meaning the sound will go through it but will be picked up by the board.
This process of doing the ceiling is something a homeowner can efficiently tackle.
Step 1 – You need to place the fiberglass boards on the ceiling.
Step 2 – Install the edges.
Step 3 – The final step is to stretch the fabric and put it on the boards. The track molding will easily grab the fabric, so it’s kept in place.
9. Baby Monitor So We Can Hear the Baby
Wireless video baby monitor
The soundproofing did help us a great deal but don’t worry after you’re done soundproofing the baby’s room you will still be able to hear or see the baby with a baby monitor.
At least with this little trinket, there’s a volume adjuster! The one we have has the video with night vision, there are almost 20 000 reviews, and IMO the price is reasonable for all the features. Here is the Amazon link for more info and price.
10. Installing new insulation if you’re remodeling Your house or building a new home
When installing the insulation into the walls, you need to be very careful and meticulous to ensure that there are no gaps And that it fills in the cavity in between the studs.
After you’ve assured that all the stud cavities are filled, you will need to begin looking for any gaps and cracks in the wall. Small cracks are an accessible path for noise to get through.
It’s not used or tested thermally, its tested explicitly for its ability to reduce noise transmission in floors, ceilings, and walls.
Conclusion
Your baby’s sleep cycle is much more frequent than an adult cycle. They have many periods of deep sleep and also light sleep every night. While in a deep sleep cycle, your child can comfortably sleep through ambient noise without a problem, hence the white noise machine. However, during those many light cycles, they are much more susceptible to waking up when louder harsh sounds are introduced.
“Cycles of deep and light sleep last 30-50 minutes in babies, then gradually increase in length across childhood. Some babies and children fall deeply asleep very quickly. Others sleep lightly, fidgeting and muttering for up to 20 minutes, before getting into deep sleep.” Excerpt from raisingchildren.net.
No matter how light or deep a sleeper your baby tends to be, good soundproofing in the nursery will allow for a more restful sleep. It can be an easy DIY job that will only cost a few hundred dollars. In my experience, it’s worth it, mainly since im already thinking of converting the nursery into a home theatre in 18 years or so.
I hope you found this article helpful, please leave a comment if you think of something that I might have overlooked. Also, share to all your expecting mommy friends and anyone with an infant.
So I’m guessing that you’re here to find out How to Soundproof a Home Office and that won’t break the bank in the process of doing so!
When I started working from home a couple of years ago, the sound quickly became an issue with my three young boys playing in the other room. Since then we’ve moved once, and I’ve learned from the last house how to better soundproof my home office. Each soundproofing project is unique, but most home offices can be efficiently soundproofed for just a few hundred dollars if you’re smart about it.
Before I begin, a CRITICAL tip that will likely save you tons of money on this project is understanding the difference between sound deadening and sound blocking!
Difference Between Sound Deadening and Sound Blocking
The difference between sound deadening and sound blocking, for example, suppose you have three noisy boys in a room adjacent to your office; You want your office to be quieter, so you purchase sound deadening curtains to put over the windows, you know those pointed foam panels like you see in recording studios.
Unfortunately, you could spend over a thousand dollars on those purchases, and it will do very little to soundproof your office. Those products help with sound deadening by preventing noises from echoing around the room. However, they will not be sufficient for keeping different types of sound from outside the room from entering.
Sound blocking products will help to prevent any types of sound from entering the room at all. Sound blocking requires thickness to be most effective. This is why it’s much easier to build a home office and make it soundproof than it is to sound block an existing home office.
If you’re building a house, you can have the builder merely use sound blocking drywall or soundboard to prevent sound from entering the room.
If you are trying to cut out sound from outside the home, then a new soundproof window can fix many issues for just a few hundred dollars installed.
Step 1 – Soundproofing Office The Door
And now we can tackle The most substantial “big rectangular hole” in your office which is unquestionably the door! The door is almost certainly the biggest problem in your home office. There are several steps you can take to soundproof the door or doors if you’re in that unlucky soundproofing predicament.
The least expensive and quickest way to soundproof your door is to get an inexpensive soundproof weatherstrip (like this one on Amazon) to put under and around the door. I like the type of soundproof weather strip that is equipped with adhesive so you can just unwrap it and stick it to the door jam. That will at least stop sound from going straight into your office.
You can have a thick door made of solid steel; it won’t make much of a difference regarding sound barriers if you have a massive crack at the bottom of your thick door!
If you have carpet under your home office door, then you’ll also need a draft stopper. A draft stopper will glide across the bottom of the carpet and provide soundproofing. So you’ll use the adhesive strip around the top of the door and the door jam, and the door sweep on the bottom of the door.
Hollow Core or Solid Core Door?
Difference between Solid core door and Hollow core door.
Next, consider changing out your door for a solid-core door. Go up to your door and knock on it. If it sounds heavy and thick like a chunk of wood, then you have a solid-core door. All exterior doors will be solid core. Doors that lead to another interior room of the house are almost always hollow-core doors, which do little for soundproofing.
If you have a hollow-core interior door leading to your home office or worse a glass garden style door; consider heading to Lowe’s or Home Depot and buying a stable core door for $99 and paying a handyman $75 to install it isn’t a bad idea. That’s undoubtedly a Quick fix, but you’ll still want to put on the adhesive soundproof weather strip I mentioned earlier.
In one of my co-workers home office, he simply installed a second door. I was a little perplexed when he told me that, but I saw it for myself. He just had a handyman build a second door to his home office.
Now you have to open and go through two doors get into his home office. This made a DRAMATIC improvement in the quietness of his office. This may not work in all homes, but if your layout works and the size of the door frame allows space for having two doors, then it’s something I recommend.
Another option if you don’t want to buy or can’t afford a brand new solid core door is to get a soundproofing blanket and hang it on back of the door. Soundproof blankets can be as useful as a solid core door and cost much less.
Also, you may want to consider looking around at some places where they sell used doors and home building supplies for cheap; you might find what you’re looking for and only have to add some paint to make it look good.
Step 2 – Preventing Structural Sound From Entering Your Soundproof Office
If you have followed all the steps in phase one and you’re still having trouble with sound coming into the room, then the chances are that you have structural soundproofing issues.
In my previous house, my home office was directly above the garage. We were living in a split entry home at the time. When my wife would come home using the garage door opener, It made the typical garage door opening sound. It was a loud, low grinding sound.
Since the garage door opener was mounted to the ceiling downstairs, the vibrations were sent through the studs directly into my home office. Experts call this structural sound.
The only way to stop structural sound is by using isolation techniques. This means separating layers of your wall so the vibrations of sound can be dampened, and not passed to another layer.
So the way you’d do this is by hiring a handyman to install a second layer of drywall on all of the walls of your office. This pushes in the room by one inch, and I’m telling you, you won’t even notice the difference after the drywall is installed; it will dramatically reduce the level of sound–especially low frequencies like traffic or structural sound.
When your handyman comes, you’ll need to have a sound channel and sound clips available that he’ll install between the layers of drywall to stop the sound.
Step 3 – Preventing Echo Inside the Soundproof Room
The last thing you can do will probably make the smallest difference concerning actually dropping the decibel level in your home office, but it can make the sounds that do come in be less annoying by stopping the echo.
Isolating the Source of the Echo
First, decide how much of an issue your room has regarding echoes. Walk into the room and shut the door and yell something as loud as you can. Listen for the remarkably short echo after screaming to see how much vibration is happening within the interior of the office.
Think, for every single sound that comes into your office, that sound is reverberating for another 1/4 second or so.
Preventing echo won’t make the room quieter, but it will make any echoing sound much less annoying. So that’s mainly why anyone would want to control and reduce as much echo as possible.
Fortunately, stopping the echo is very simple. First of all, look to your floors. If you have tile, wood, or another hard-surface flooring, this will dramatically increase echo. The solution is simple, go off and buy a big and thick plush rug and lay it on the floor, new look, no echo!
Elimination of as Much Echo
Next, look to your walls. If your room has facing walls as all square or rectangle rooms do, softening sound on the walls can help. Put up curtains to keep noise from bouncing off windows. Put up a large canvas gallery artwork on the wall with some foam behind to soak up the sound bouncing on the walls.
The key is adding as much thick, soft materials around the room as possible to make your soundproofing as effective as possible.
It’s hard to make out the words because the music is echoing so much inside the room. Then keep the music playing on your phone and walk into the closet where there are lots of clothes hanging on the walls. The soft material from the clothes soaks up all the echo and makes the room feel so much quieter.
Step 4 – Soundproof Paint
Have you ever hear of soundproof paint? Well, it does exist and would contribute to sound absorption and noise blocking of up to 30%.
The soundproof paint that I’ve worked with in the past is called Acousti-Coat (Amazon). Acousti-Coat is a water-based injected with microspheres and sound absorbing fillers. The soft pigment fillers absorb sound and help to prevent it from bouncing off the walls and ceiling.
Noise in the 500Hz range is reduced by 30%. 500Hz is the mid-frequency of the human voice.
Soundproof paint is a relatively inexpensive way to help reduce the transfer of noise while you’re trying to soundproof a home office.
The soundproof paint will especially help on the ceiling where you have people above you walking around and talking. It will also help eliminate the tin noise of a metal roof from transferring down through the structure of the house.
Step 5 – Soundproofing the Air Vent
I bet you never thought of soundproofing the air vents, have you? Well, soundproofing the air vents in any room is commonly overlooked; unless there is noticeable noise coming from the vent itself.
Aside from the doors and windows, the air vent would typically be the biggest hole in any room. The most significant difference however between the doors and widows versus the air vent is that the air vent is open while the others are not.
There are a few ways to soundproof an air vent. You can either block it off entirely and paint over; if it’s just an overhead door air vent going from room to room. Or you can also replace the vent cover with a vent silencer.
The third option to make an air vent quieter would be to build a sound maze inside the vent. An air maze (image below) will significantly help reduce the transfer of sound waves but will not block the flow of air coming in from another room.
Air Vent Sound Maze
If you’re dealing with an air vent attached to a heating or cooling system there are ways to make a bit quieter if you’re having issues with noise.
The most common noise coming from an air duct would be a vibration noise while the air is pushing through the grill. Either the metal-air shaft is vibrating, or the grill itself is making a vibrational noise.
Either way, stick a few strips of sound absorption tape directly on the air shaft. The tape should reduce the vibration reasonably quickly.
I know for myself, living with three small boys can get very loud at times inside my home. Something I often wonder is if I should take my office outside. If you can’t win, might as well leave.
Usually, I would move my office during the summer months and work outside on the back deck. If you have space, you can run off to have some quiet time then that might not be such a bad idea. Going outside could work if the noise coming into your home office is not occurring every day.
If the noise is constant and you don’t have the means in the short term to renovate your home office perhaps try another room in the house. I for one find the garage the quietest place in the house when my kids are terrorizing the inside of my home.
Most people like myself do not require much these days regarding a home office. I like to work on a desktop computer if I am working on larger projects; but most of the time all I need is my laptop and an internet connection, oh and a chair.
A local coffee shop also works because I find the noise of people talking in the background eventually turns into white noise.
Step 7 – Trade the Noise With White Noise
Use a white noise machine for the home office.
If you can’t move to another area like I was mentioning above, and you’re forever stuck attempting to soundproof your home office, then there are things you can do to help drown out some of the noise.
Let us imagine that you’ve done at least some things on this list regarding soundproofing a home office, and you still hear some noise; try a white noise machine.
If you can still hear the background noise, then a white noise machine could help in your effort to make your home office more peaceful.
A white noise machine works by creating a constant noise. Unlike a thunderstorm or waves crashing on the shore which is not constant, white noise is more in line with the sound from a fan.
A fan emits a constant noise while a lightning storm creates jarring noises when lighting strikes.
The white noise machine I always recommend is the Marpac Dohm All Naturel White Sound Machine (Amazon). The reason why I like this particular system above its competitors is that this one uses a fan inside the machine to make the noise.
There is a cover so you’re not bombarded with cool air of course. Almost all of the other types of white noise machines make sounds that come out of a speaker. You might as well download an app if you’re going to go that route.
Step 8 – Ever Try Noise Cancelling Headphones?
Have you ever tried a pair of noise-canceling headphones? I have, and I really like it when I want to drown out the background noise while trying to listen to a podcast.
If you’ve soundproofed enough of your home office but you can still hear a nagging sound that is constant then slapping on a pair of noise-canceling headphones would be an easy fix.
The only catch with these types of headphones is that the noise needs to be a “constant background noise”. That means that if the background noise is coming from brawling kids, then these headphones won’t work.
One question I was asking myself before I began looking into noise-canceling technology is if I had to listen to something for the noise canceling to work as intended.
I was happy to hear that no, you don’t need any music. All you need is to turn them on and make sure the noise-canceling feature is also turned on, and you’re good to go.
The ones I use and also recommend are the Sony WH-CH700N (Amazon). They might not be an Amazon bestseller but those are the ones I actually have and I’m pleased with them. Try to buy them when they come on sale.
Step 9 – Soundproof the Ceiling
If you are having problems with stomping noises coming from above your home office, there are ways to go about correcting this problem.
There are a few ways to go about soundproofing a ceiling inside your home. The most common way to go about this is adding some 5/8″ sound absorbing drywall along with some Green Glue (My review).
One of the ways that I find works best when soundproofing an existing ceiling is by adding a resilient channel between the ceiling and the new sheet of drywall.
A resilient channel is a type of construction material that is used to reduce the transmission of sound through walls and ceilings.
As you probably already know, sound waves travel much easier through solid objects. Think of when you were a kid, and you would press your ear on the rail of a railroad track to hear if there is a train coming, same concept.
So since sound travels better through solid objects you have to create an air cavity, hence the resilient channel. The resilient channel consists of sheet metal studs that are used as a barrier between the ceiling and the building framing.
Since you already have an existing ceiling, all you need to do is add the resilient channel and then add some drywall over creating a second ceiling. You shouldn’t feel the room become any smaller by doing this.
The gap left by the resilient channel will muffle out the noise coming from upstairs leaving your home office much quieter.
Here is a link to our article on how to soundproof a basement ceiling. The same process would apply as soundproofing your basement ceiling as your home office ceiling. We demonstrate different examples of how to get the job done right.
10. Fill the cracks and Gaps
Starting a soundproofing project from scratch is one thing, but some people already have a decent setup. There might not be that much going wrong with how everything is laid out, other than just needing some touch-ups here and there.
Something as small as a simple crack or crevice in the drywall can allow noise to enter a particular area. Cracks can form just about anywhere, but they seem to be close to things such as outlets, air vents, ducts, and more.
To fix most of these issues, some simple caulk will do the trick. Some do a better job of controlling sound than others, so look for something that pertains specifically to acoustic performance.
It helps always to have some caulk ready to go when something comes up. It is very easy to store away until needed, and it works pretty much like a repair kit at any point. For bigger repairs, having a professional come out might make more sense. However, for simple cracks, that is easy enough for people to repair on their own.
11. Soundproofing The Windows
A home office might have limited windows, but they can play a huge role in causing sound. A lot of people who run tests to identify sound sources will eventually figure out that a lot of noise is coming from that area, so what should a person do to tackle everything?
The most affordable way is to look into soundproofing curtains that also help to block the sun very well. These curtains are very thick and heavy, but they can be closed to prevent sound from coming in.
They do not really stand out too much, so do not think of them as being too heavy-duty for a home set up.
If a person prefers to have the windows open, another option is to look at different types of windows. A double-pane window is going to do a much better job of blocking out noise coming from outside.
It is a bit more expensive for an upgrade, but it is something that people feel is well worth the investment if that sounds too much to handle every single day.
Any leaks or cracks around the window cannot only affect the amount of sound coming in, but it can negatively affect the temperature as well.
People should never let anything involving the windows get out of control. If there is something wrong, it needs to be addressed to control soundproofing issues.
Plan Before you Begin Soundproofing a Home Office
Sometimes the biggest downfall of any project, be it major or minor, is the lack of planning that went on before the job started.
Before you do anything, write down on a piece of paper exactly what noises are the ones you want to eliminate and where they are coming from.
If the noise is coming exclusively from outside, then focus on the exterior wall and window. There is no need just yet to attempt to soundproof your office door if you’re worried about barking dogs or outside traffic.
All I’m saying is soundproofing a room in your home does not have to be terribly costly or complicated.
All you need to do is figure out where the culprit is and fix it and stop worrying about soundproofing anything else in your home office.
Conclusion On your DIY Soundproofing Project!
Working from Home is a blessing! I entirely love not having to commute every day. By following all these steps, my office is now quiet and peaceful.
It’s nice to be able to go into my office, shut the door; And have as much privacy and ability to focus on my work as if I were in an actual place of business.
I hope this was helpful to you and that you’re successful in knowing how to soundproof a home office in the cheapest way possible!
This website uses cookies to improve your experience. We'll assume you're ok with this, but you can opt-out if you wish.AcceptRejectRead More
Privacy & Cookies Policy
Privacy Overview
This website uses cookies to improve your experience while you navigate through the website. Out of these cookies, the cookies that are categorized as necessary are stored on your browser as they are as essential for the working of basic functionalities of the website. We also use third-party cookies that help us analyze and understand how you use this website. These cookies will be stored in your browser only with your consent. You also have the option to opt-out of these cookies. But opting out of some of these cookies may have an effect on your browsing experience.
Necessary cookies are absolutely essential for the website to function properly. This category only includes cookies that ensures basic functionalities and security features of the website. These cookies do not store any personal information.